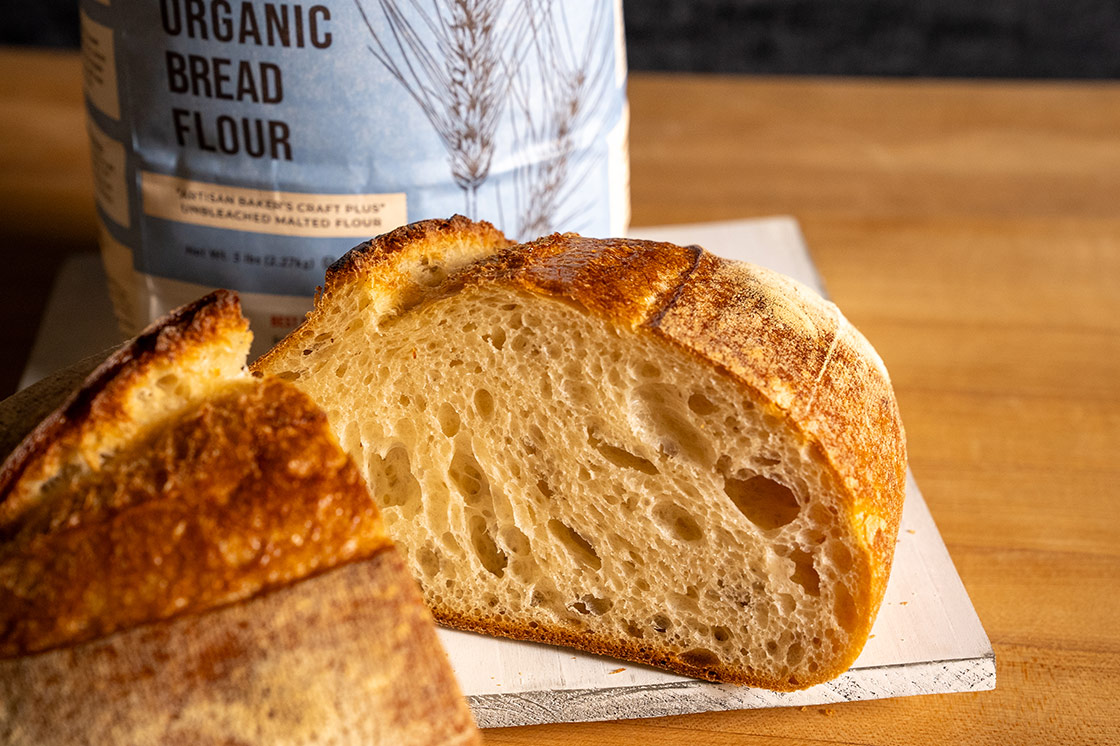
This sourdough bread formula will yield 2 beautiful loaves of sourdough – just like the you’ve been drooling over on your social media feeds. As with any sourdough, there are a lot of steps involved, which can be overwhelming for beginners. But we crafted this sourdough bread recipe (including the process notes) to be as easy as possible for baking sourdough at home. It features just the right amount of technique to give you great results without too much fuss. The formula makes two 700g loaves with a total dough weight of 1400g, which is very manageable for home bakers, even when mixing in a stand mixer like a KitchenAid.
It also uses our best-selling Organic Bread Flour which is like magic for home bakers. In addition to just the right amount of high-quality protein and ash (11.5% and 0.60%, respectively), it is malted with Organic Malted Barley. The malt addition creates a more predictable fermentation and helps with the maillard reaction that lends both flavor and color to your crust (it’s science, baby!).
And, similar to our Sourdough Table Bread, this loaf also uses a technique called “double hydration.” When mixing a dough that has high hydration (this one clocks in at 75%), this technique will help reduce the amount of time spent mixing the dough. When mixing by hand, it also uses a technique called “autolyse” which is just combining the flour and water together and letting it rest for a bit before mixing in the starter (in this case a liquid levain) and salt. This essentially kickstarts gluten development and helps with fermentation, ultimately improving the bread’s flavor, texture, and appearance.
Timing
Total Time: ~2 days / Active Time: ~35 min / Baking Time: ~45 min
Formula
Number of Units: 2 loaves / Unit Weight: 700 grams / Total Weight: 1400 grams
| LIQUID LEVAIN | Fermentation: 12 hours at 70°F | |
|---|---|---|
| Baker’s % | Weight (grams) | |
| Organic “Artisan Bakers Craft Plus” Bread Flour | 100 | 86 |
| Water | 100 | 86 |
| Active Sourdough Starter | 40.0 | 34 |
| Total | 240 | 206g |
| FINAL DOUGH | Baker’s % | Weight (grams) |
|---|---|---|
| Organic “Artisan Bakers Craft Plus” Bread Flour | 100 | 686 |
| Salt | 2.0 | 15 |
| Water 1 | 69.0 | 474 |
| Water 2 | 3.0 | 21 |
| Levain | 30.0 | 206 |
| Total | 204 | 1400g |
| TECHNICAL | ||
|---|---|---|
| Desired Dough Temperature | 75–78°F | |
| Mixing Type | Stand Mixer | |
| First Speed* | 5 minutes | |
| Second Speed* | 8–10 minutes | |
| Gluten Structure | Improved | |
| First Fermentation | 2 hours | |
| Folds | 3, every 30 minutes | |
| Dividing | 700g or 2 equal portions | |
| Pre-shaping | Round | |
| Resting Time | 20 minutes | |
| Shaping | Boule or Batard | |
| Final Fermentation | 1.5 hrs @ room temperature, then 12–16 hours in fridge | |
| Baking** | 20 min @ 450˚ F + 25–35 min @ 425˚ F | |
| Steam*** | Yes, if baking on stone or steel | |
*Mixing time can vary depending on the mixer.
**Baking time and temperature can vary depending on your oven, especially if baking on stone or steel.
***There are many ways to create steam in a home oven, but one of the most effective is to pre-heat a shallow pan in oven with your stone or steel and, after placing the dough in the oven, pour a cup of ice into the hot pan.
Timing
Total Time: ~2 days / Active Time: ~35 min / Baking Time: 45–55 min
Process
Two Evenings Before Baking
In a medium bowl, mix all the ingredients for the Levain together until they are thoroughly combined and there is no visible dry flour in the bowl.
Cover the bowl in plastic wrap and let it sit in a warm place for ~12 hours.
Day Before Baking
If Mixing with a Stand Mixer
In a large mixing bowl, combine flour and salt until they are thoroughly mixed.
Add your levain to the dry ingredients and 90–95% of Water 1 and using a stand mixer, mix on low speed (speed 1-2) for 5 minutes. Near the end of the slow mix, add the remaining part of Water 1 into the bowl. This water will help pick up and hydrate the leftover dry flour in the bowl.
Once the dough doesn’t have any more visible dry flour, go ahead and increase the speed of the mixer to low/medium (speed 2–3) for 6–8 min. This stage will help to develop the gluten structures within the dough.
The dough should start developing a smoother surface, pull clean from the sides of the bowl, and has the ability to create a window pane with slightly jagged tear. When this happens, reduce the mixer speed to low and slowly add in Water 2. This should take about 3 minutes for the water to be fully incorporated into the dough.
Once the water has been absorbed and the dough has gained some strength, stop the mixer and cover the bowl with plastic wrap. The dough will be going through the first fermentation of 2 hours. During this time, you want to develop the gluten with a series of “stretch and folds” every 30 minutes:
Let the dough fall from the bowl onto the table, scraping out the remaining dough if needed.
Take the top part of the dough, stretch it away from yourself and then fold it back on to the dough (towards yourself) about 1/3 of the way. Now, take the bottom of the dough and do the opposite: stretch it towards yourself and then fold it back over the first fold to the end of the dough.
Do the same to the left and right side.
Next, take the top of the dough mass and fold it over the center, in thirds, and continue the motion until it has rolled over with the seam-side down and smooth side up.
Slide both hands underneath the halfway point of the dough, vertically. Lift it up and place it back in the bowl allowing the ends to tuck themselves under, leaving a smooth surface on top.
Cover the bowl and let the dough rest for 30 min and repeat the folding technique until 2 hours have passed. With each fold, you should be able to start feeling the dough gaining strength and start seeing the surface of the dough becoming smoother.
If Mixing by Hand
In a large bowl add the flour and water 1, mix until both are combined well. Cover the bowl and let the dough go through an autolyse for 30 minutes. After 30 minutes add the salt, sourdough starter, and water 2. Mix until fully combined for about 5 minutes.
Now begins the first fermentation, your bulk fermentation, which will last two hours. You will perform stretch and folds every 15 minutes, following the instructions above. If you find after the first hour of stretch and folds that the dough is beginning to tear, space out the stretch and folds to be every 30 minutes.
Shaping
After 2 hours, turn the dough out onto a lightly floured surface, divide it into two equal portions, and loosely preshape into balls. Place seam-side down on the table and let rest for 20 min. If there is a draft, cover the dough with a towel to prevent the surface from drying out. Note: Take care to not use too much flour as you are shaping. You don’t want the dough to be too sticky, but you also do not want to have a lot of raw flour inside the dough.
During this time, prepare a bread form (like these 8″ round proofing baskets or 8″ oval bannetons) or by either dusting the inside with flour or placing a linen cloth inside the form and dusting the cloth. After the dough has rested for 20 min, take each piece and final shape it into a round boule or oval batard, and place the dough into the form with the seam side facing up. Some notes on shaping:
In general, when shaping your dough be aware of the pressure you are putting on the loaf and the amount of tension you are building. It is an important skill to read your dough and learn how to handle it. If you are too heavy-handed, you will de-gas your dough, it might tear, and your loaf may end up with a tight crumb. On the other hand, if you don’t create enough tension on the outside of your dough, it won’t hold its shape, your crumb may have irregular holes, and be lacking in volume. Finding a balance is key.
To shape a boule, flip the dough over so the seem side is up. Gently stretch the outside of the dough and pull it into the middle, work your way around the dough until all sides are in the middle. Flip the dough over and round it on the table using the friction of the table to build tension on the top of the dough. To do this, you can either use your hands and work the dough in a circular motion or use a dough scraper, rotating the dough and pulling gently towards your body. Do this until your seam is closed and the outside of your dough has a nice amount of tension. It should be taut, firm, and smooth, but not torn.
To shape a batard, flip the dough over so the seem side is up. Gently stretch the right and left sides of the dough into the middle and a bit towards you so the top edges are kissing. At this point, the dough should look more like an “A” and less like a rectangle with rounded top and bottom. Next, roll the dough from the top towards you about 3–4 times, building tension as you go, until you reach the bottom of the dough. Use the palm of your hand and gently/firmly press along the seem to ensure it is closed. Lastly, with the seam-side down, place your hands towards the ends of the dough and, with gentle yet firm pressure, roll it away from you to seal the ends. Place the loaf into your basket seam side up, making sure the seam is sealed (you can even pinch along the edge of it to help close, if needed).
Cover the dough with a thick linen cloth and let the dough ferment a second time for 1.5 hours. Once the dough has finished the second fermentation, cover with plastic wrap and place it in the refrigerator for 12–15 hours.
Baking Day
This bread can be baked in a dutch oven or directly on a baking stone or steel. Either way, preheat your oven to 475˚F for at least an hour prior to baking with your dutch oven or stone/steel inside.
If you are baking in a dutch oven, gently turn the dough out onto a sheet of parchment or a silicone bread sling and score the top of the dough. Take the dutch oven out and remove the lid. Gently lower the dough into the dutch oven and cover with the lid. Place it back into the oven and lower the temperature to 450˚. After 20 min, remove the lid, lower the temp to 425˚ and continue baking the loaf for another 25–35 min.
If baking directly on a steel or stone, turn the dough gently onto a light dusted peel or sheet of parchment, score the top of the dough and slide it onto the steel/stone. Quickly add steam (see note under the technical table above for one way to do this) into the oven, close the oven door, and lower the oven temperature to 450˚F. After 20 minutes, give the loaf a turn, lower the oven temperature to 425˚ and continue baking the for another 25–35 minutes.
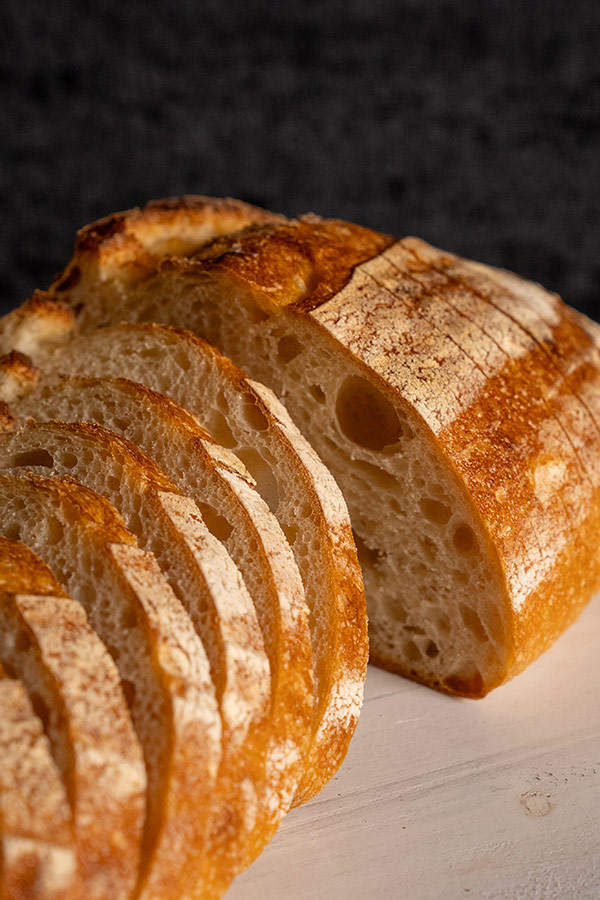
The bread is done when the crust develops a dark golden color and when knocking on it, it should sound like a hollow thud. The bottom of the bread should be baked well, but not be burnt.
Take the bread out of the oven and place it onto a cooling rack and let it cool completely (1–2 hours) before cutting into it. This is the hard part. But trust us, it’s worth the wait!
Let’s Talk Starters
Your sourdough starter is the lifeline of your bread. It provides flavor and volume to your final loaf.
When it comes to sourdough starters, the two main versions you’ll encounter are liquid levain and stiff levain. So, what’s the difference? And why choose one over the other? There is plenty we could dive deep into about pH and acid breakdown but, for now, let’s just focus on the flavor differences and the handling of each.
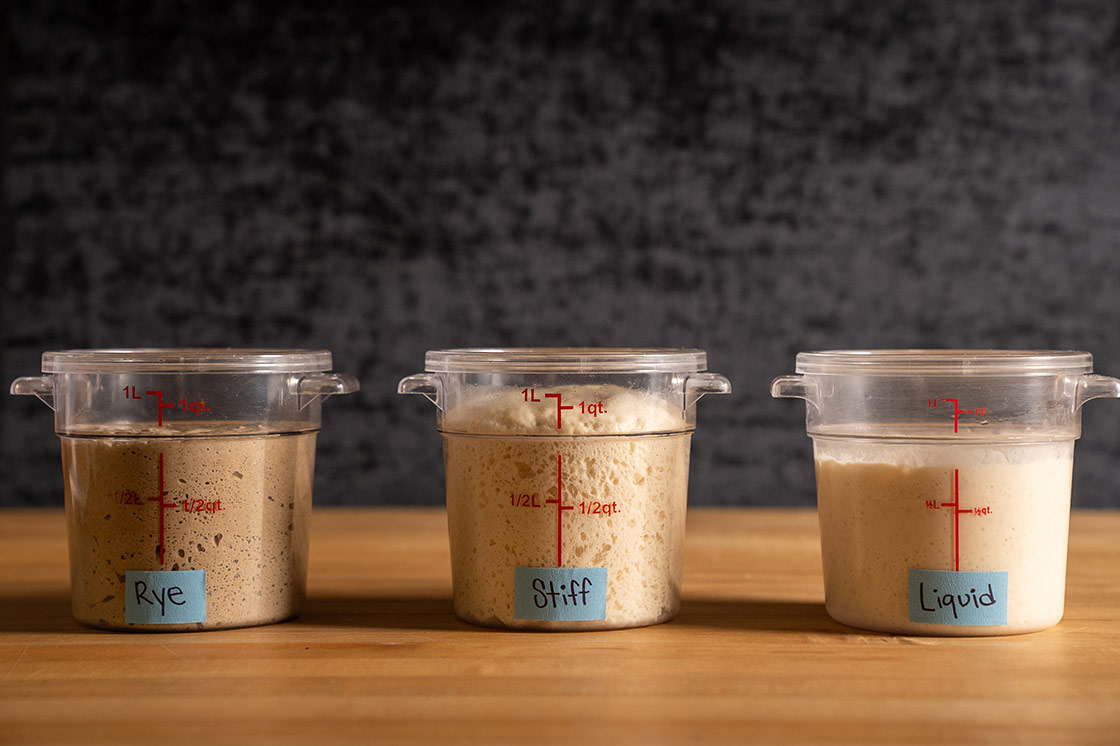
Liquid Levain
A liquid levain has a liquid viscosity, made up of 100% flour and 100% water. It typically offers a more lactic flavor, resulting in sweeter notes in your bread. However, maintaining a liquid levain at home can be more challenging. It ferments faster—anywhere from 6 to 12 hours, depending on the ratio of seed (the bit of starter you mix back into the new batch from the old) to flour and water—so it may not fit easily into a busy baking schedule. Additionally, liquid levains can be messier to handle. You might find your starter dripping off your arms, onto the counter, and onto the floor!
Stiff Levain
In contrast, a stiff levain has a thicker consistency, composed of 100% flour and around 55% water. They tend to impart a more pronounced sour flavor—think of that classic San Francisco sour that hits you in the back of your jaw. Stiff levains are easier to manage at home; they ferment more slowly, allowing you to feed your starter every 12 to 16 hours with greater ease. Plus, because you’re working with a dough-like texture, it’s less messy. Once mixed, it forms a manageable ball that can be moved and divided without any lingering drips.
Rye in Sourdough Starters
There’s also a wealth of information out there on using rye in your sourdough starter. In general, Rye flour has more enzymatic activity, making it a great option for reviving a sluggish starter. If you use a 100% rye starter, you will notice added flavor and color in your final loaves. Just be aware that your starter will mature (and be ready to use) a lot quicker.
Personalization
Keep in mind that these guidelines are just that: guidelines. You can adjust the flavor and sourness of any starter by tweaking the seed, temperature, and fermentation time to suit your preferences.
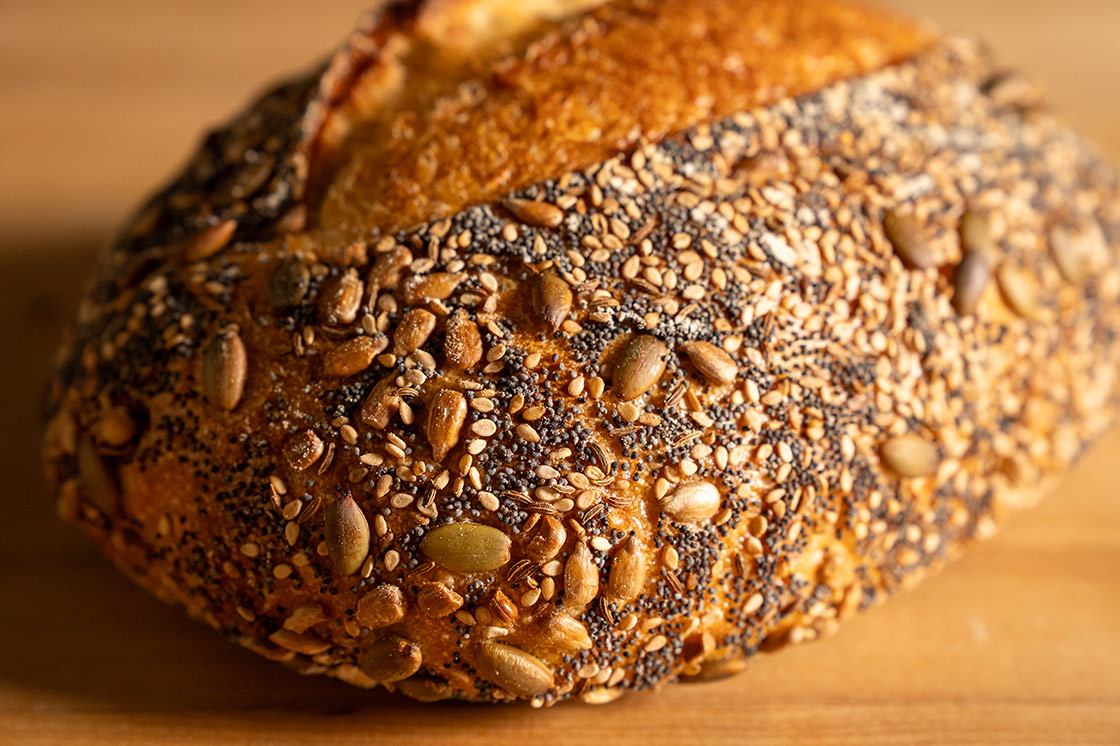
Seeded Sourdough
Rolling your loaf in seeds will not only add a ton of flavor but it also looks stunning. For seeded sourdough, there are just a couple steps to add to the process…
After preshaping, while your dough is resting and after you’ve prepared your bread form, get a damp kitchen towel and place it on a small sheet pan. Then, place your untoasted seeds (toasted seeds will burn in the oven) in a wide bowl or another small sheet pan large enough to roll your dough in. After final shaping your dough, gently roll the top on the damp towel, then into the bowl with the seeds. Place the loaf seeds down (seam-side up) in the lightly floured banneton.
For added flavor you can also add toasted seeds inside your loaf of bread. You will want to use around 10% seeds (to flour weight) in your dough. Just make sure to soak them before adding them so you’re not stealing hydration away from your dough.
FROM THE MILL


